Key Takeaways
- Labeling electrical wires streamlines both installation and future troubleshooting.
- Proper organization and sheathing protect and distinguish every wire in a harness.
- Applying clear, durable labels helps identify wiring easily under any condition.
Overview of Electrical Labeling
When you're building a harness, it's crucial that you label each wire and terminal. This ensures you don't get wires mixed up upon installation. In this guide, I demonstrate the process of printing and applying labels to a wiring harness for a chase bar, which has multiple functions requiring distinct terminations.
Tools and Materials
- Brady BM 21 Plus Label Printer: A versatile label printer for electrical applications.
- Label Ribbons: Available in various colors and sizes, allowing for customization and contrast against wire insulation.
- Example: Yellow ribbon for black on yellow labels
- Raychem DR-25 Sheathing: Durable quarter-inch sheathing for wire protection and organization.
- Razor Blade: Aids in precisely placing labels without smudging.
- Heat Gun: Utilized to shrink the labels onto the wiring for a secure fit.
Process
Follow these steps to ensure your labels are affixed properly:
- Choice of Ribbon: Choose your label ribbon color and size; 3/4 inch is often a good all-purpose size.
- Printing Labels: Using the label printer, input your desired label — in this case, "Chase bar harness."
- Applying: Carefully use a razor blade to apply the label to the desired location on the sheathing.
- Sealing: Position your heat gun over the label and apply heat until the label wraps securely around the sheathing.
Remember, the key to a successful label application is ensuring that the label lies flat against the surface. This paves the way for an easier and smoother labeling process.
Tips
- Experimentation: Try different label sizes and colors to match your specific needs.
- Font Size Adjustment: Modify the font size based on the detail and size of the wiring harness you’re working with.
- Quality Control: Ensure all connections, crimps, and terminations are well-executed for the reliability of the harness.
- Visibility: Place labels where they are easily visible for quick identification during maintenance or troubleshooting.
Through this approach, you'll achieve a wiring harness that is not only functional but also easy to navigate. Investing this extra effort now will simplify your job when diagnosing or installing systems in the future.
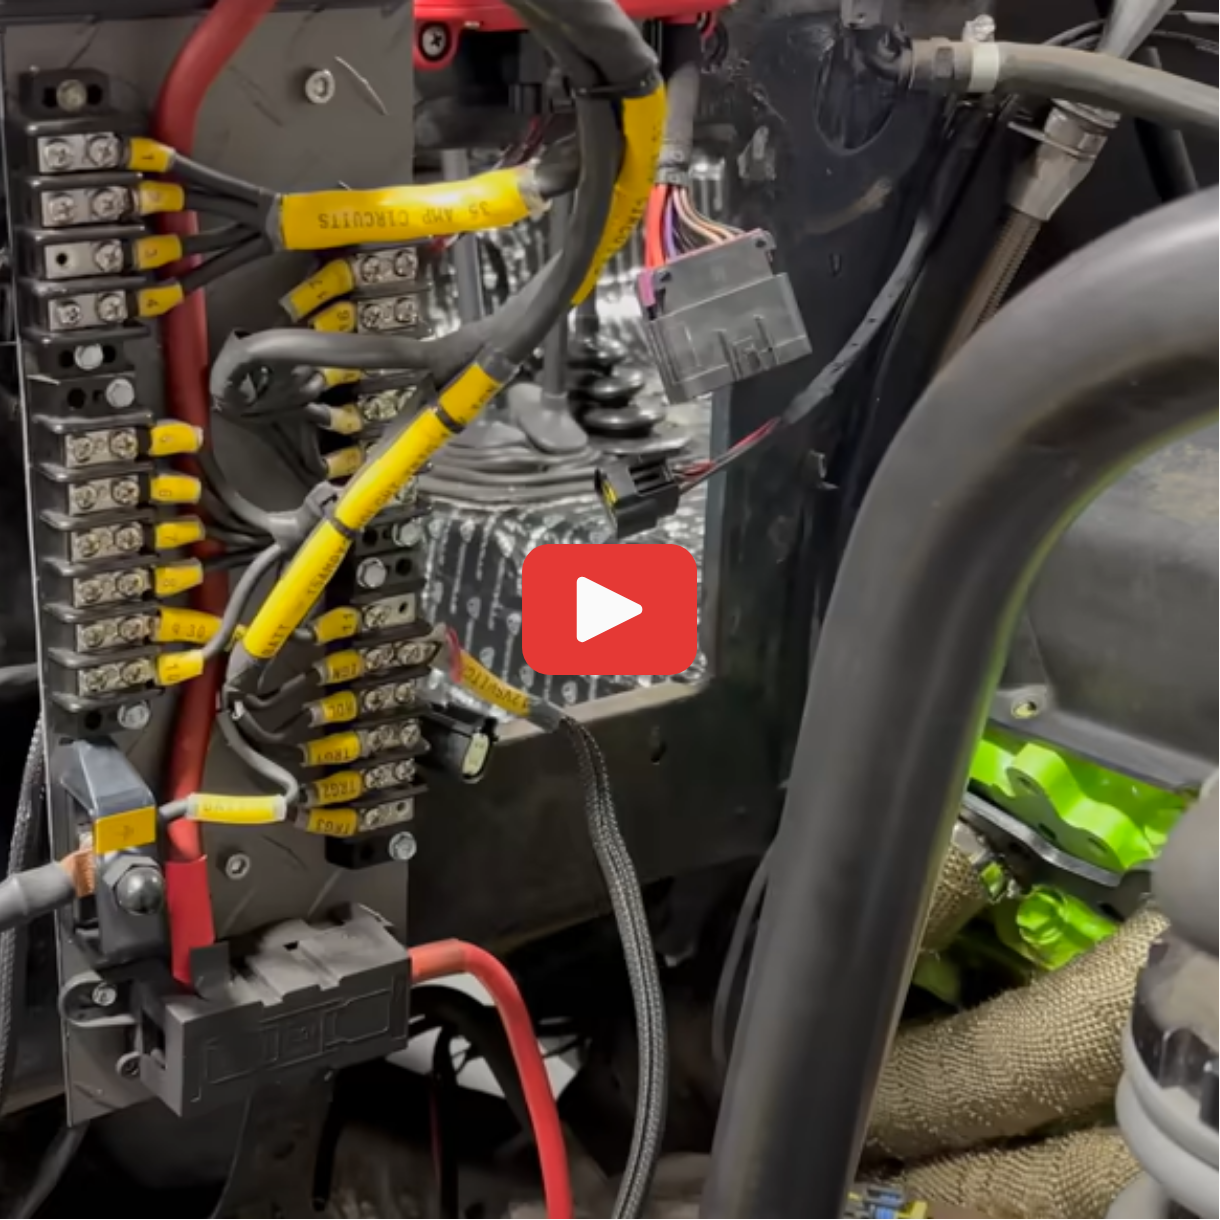
Presentation of the Wiring Harness
In today's tutorial, you'll learn how to effectively label your electrical wiring harness which is essential for simplifying the diagnosis, troubleshooting, and installation processes. As you're aware, unlabeled harnesses can become indistinguishable once installed. The main focus is the custom wiring harness built for a chase bar, which contains multiple terminations for power, constant and flashing lights.
For this harness:
- Terminations of interest are bundled into an 8-pin DEUTSCH connector, chosen for its reliability. Such connectors, though not essential, are personal preferences for their robustness.
- Raychem DR-25 sheathing protects the wiring. It’s a quarter-inch sheathing known for its durability and ease of heat shrinking, contributing significantly to the wire organization.
For labeling:
- The tools include the Brady BM21 Plus label printer, compatible with various colored ribbons. The chosen scheme for today's task is black text on yellow ribbon, which suits the visibility needs underneath the truck.
- Label width is determined to be most effective at 3/4 inch for the current set of wires, accommodating clear text display without needing to resize much.
Labeling steps are as follows:
- Insert the chosen ribbon – in your case, the 3/4-inch black on yellow – ensuring to close the printer latch properly.
- Input the desired label text, for example, “Chase bar harness,” and print out the labels.
- Use a razor blade to carefully apply labels without leaving fingerprints on the adhesive side.
- Position the label on the sheathing, prioritizing a flat application for the initial portion to secure a smooth application all through.
- After positioning, apply heat evenly using an affordable heat gun, thereby sealing the label onto the harness.
This process results in:
- Durability: The label will withstand rugged conditions.
- Readability: The contrast ensures labels are easy to read.
- Ease of Maintenance: Quick identification aids in future troubleshooting efforts.
Remember to experiment with various label sizes and fonts as per the needs of your harness configuration. The label maker can enhance the troubleshooting of electrical issues by marking critical cables and connections clearly.
By adhering to these steps, you're not only ensuring a clean setup but also future-proofing your electrical system for easy maintenance. And as you've requested resources for these materials, links have been provided for your convenience.
Don't hesitate to reach out with your current project queries or further electrical questions. Your feedback is invaluable as it helps in shaping upcoming tutorials to better address your needs. And if you found this guide helpful, consider subscribing for more updates and insights.
Explanation of Connectors and Sheathing
When building a wiring harness for a vehicle, like a chase bar with multiple features, it's imperative to label your wires for easy identification during future diagnostics or installation. In this specific build, I chose to work with an 8-pin DEUTSCH connector because of its reliability. While high-quality connectors are not the only determinant of good electrical work, I have a preference for DEUT connectors for their robustness.
Apart from connectors, sheathing is another critical component. For this project, I'm utilizing quarter-inch DR-25 sheathing, which has admirable heat shrinkability and excellent durability, ensuring protection and organization of the wiring. To purchase the same, you can check out the link to my Amazon store.
For labeling, I use the Brady BMP21-Plus label printer, which supports various color ribbons. The colors I've incorporated in this build include:
- Black on Yellow: My primary choice for visibility and design consistency.
- Black on White
- Black on Orange
The ribbons come in different widths, and I've found that 3/4 inch suits most of my needs, but this can vary depending on the specific application. Adjusting the font size may be necessary depending on the particular wire or cable being labeled.
The process of labeling involves printing, cutting with a razor blade to avoid fingerprints, and then carefully applying the label to the sheathing. Ensuring the label lays flat during application is crucial. To seal the label onto the harness, I employ a simple heat gun, which guarantees a durable and easily readable label.
It's worthwhile to experiment with different sizes of labels and heat shrinks to understand what works best for your specific needs. Ensuring proper terminations, including crimps and grounds, significantly contributes to building a reliable wiring harness. Labeling is an additional step I take to allow for easier tracing of potential problems and quick identification when working under the vehicle.
By investing time and attention into the electrical aspect of your projects, the chances of encountering issues will likely diminish. A varied selection of label maker supplies is recommended to equip you for any future diagnostic needs. Remember to continually assess and select the tools that best fit your requirements.
Importance of Organizing and Labeling
Organizing and labeling your electrical wiring is paramount for several reasons. When working with an intricate wiring harness, such as the one for a chase bar with multiple features, distinguishing between various terminations is essential. Without labeling, all connections would look identical once installed, leading to confusion during maintenance or expansion of the system.
Labeling Components:
- Label Selection: Use different colored labels for easy identification.
- Sizing: I prefer 3/4 inch labels, as they seem to fit most cable sizes.
Labeling Process:
- Select the appropriate label color and size for visibility.
- Insert the chosen label into the label printer; in my case, a Brady BM 21 Plus.
- Print the label, mentioning the specific part it will identify, such as "Chase bar harness."
- Carefully apply the label to the wiring or component, ensuring it is straight and flat.
Labeling Benefits:
- Troubleshooting: Labels significantly simplify the diagnosis and troubleshooting process by clearly identifying each part.
- Installation: It becomes easier to install the harness efficiently, knowing exactly where each connection should go.
- Maintenance: When it comes time for maintenance, a well-labeled system enables you to quickly find and address the needed area.
Heat Shrink Labels:
- Use a heat gun to seal the labels onto the wiring, ensuring they are durable and long-lasting.
- Sealed labels are easy to read and don't wear out with time or due to environmental exposure.
Label Customization:
- The label maker allows you to adjust the font size according to the job requirements.
- Experiment with different heat shrink sizes and label types to discover what best suits your setup.
By taking the time to properly organize and label your electrical system, you are not only making current tasks more manageable but also investing in the future ease of operation and reliability of your system. A well-maintained system with clear labels is less likely to encounter problems, allowing for quick action if required.
Step-by-Step Labeling Process
Firstly, select the appropriate labeling supplies for your wiring harness. You'll need a reliable label maker, like the Brady BM 21 Plus, and various ribbon colors and widths. For this build, 3/4 inch black on yellow ribbons perfectly suit the harness for the case's highlights.
Preparing the Labels:
- Power on your label maker and insert the chosen ribbon, ensuring the gate is securely closed.
- Clear any previous label settings and input your new label text, in this case, 'Chase Bar Harness'.
Applying the Labels:
- Utilize a razor blade for precise handling, trimming, and placement of labels to avoid fingerprints on the adhesive side.
- Find a section of the wiring sheathed with quarter-inch DR25, where the label will be most visible and functional.
Securing the Labels:
- Straighten out the section of the harness where the label will go.
- Gently place and press the label onto the sheathing starting from one end to ensure it lays flat and has no air bubbles or wrinkles.
- Once in place, take a heat gun – an affordable yet effective model can be purchased from a store like Harbor Freight – and evenly apply heat to the label until it shrinks snugly around the cable.
Final Steps:
- After heating, the label should be securely sealed to the harness, providing a durable and easy-to-read identification tag.
- Reinforce other connections on the harness, making sure your crimps, terminations, and grounds are well-executed, as these all contribute to a future-proof and reliable electrical system.
Remember to obtain a selection of ribbons and heat shrink sizes to experiment with what best fits your specific harness configurations. Adapting font sizes to the job's needs and testing different label materials will help you streamline your diagnosis and troubleshooting of any future electrical issues.
Applying the Label
To ensure your wiring harness is easily identifiable once installed, such as the one for a chase bar featuring multiple terminations, it's critical to label them. The choosing of labels is crucial in distinguishing the various functionalities, including power, constant light, and flashing light.
Labeling Essentials:
- Insulation Sheathing: The use of quarter inch DR-25 sheathing is recommended for its neat shrink wrapping ability and durability, safeguarding your wiring.
- Connectors: An 8-pin DE connector, while not essential for a good electrical setup, is favored for its reliability.
Labeling Procedure:
- Select the appropriate wire ribbons, available in various colors like yellow, white, and orange. A 3/4 inch size is typically sufficient for most cables.
- Insert your chosen ribbon into the label maker, making sure it's secure before printing.
- Clear any previous inputs on your label maker and input the desired label, such as "Chase bar harness."
- Use a razor blade to carefully lift and position the labels onto the wires to avoid smudging.
- Locate a suitable spot on the sheathing, apply the label, and ensure it lays flat for a proper seal.
- Utilize a heat gun to finalize the seal, which will yield a durable and easily readable label.
Printing Labels:
- Label Maker Model: A Brady BM 21 Plus or similar is suggested.
- Label Format: For this specific harness, black text on yellow ribbon has been used.
- Customization: Change the font size depending on need to ensure clarity.
Benefits:
Labelling your harness not only assists in quick identification for troubleshooting or installation but also provides a more organized and professional look. Continuous experimentation with the variety of available labels will help you find the perfect fit for your electrical projects.
Remember, a well-labeled harness simplifies future diagnostics and contributes to a reliable electrical system. Your dedication to creating a detailed and meticulously labeled wiring setup minimizes potential issues, making maintenance straightforward and efficient.
Final Thoughts on Harness Labeling
When constructing a harness, labeling is crucial to differentiate the cables once installed. In this particular build, an 8-pin DEUTSCH connector, favored for its quality, integrates with the Chase bar's multiple features. It's important to isolate and terminate specific wires, ensuring all power and lighting functions are in order. By using a Brady BM21+ label printer and ribbons in various colors like black on yellow, black on white, and black on orange, each cable is clearly marked.
Below is a breakdown of the key components and methods:
- Connector Used: DEUTSCH 8-pin, popular for its reliability.
- Sheathing: Quarter inch DR25, known for its durability and heat shrink properties.
To maintain organization, here’s the adopted labeling process:
- Select the label size and color (3/4 inch black on yellow ribbon for this project).
- Clear the previous entry in the label maker (Brady BM21+).
- Input the label text such as "Chase bar harness".
- Use a razor blade to cleanly apply labels without fingerprints.
- Heat shrink the label onto the harness using a basic heat gun for a secure fit.
Label Placement:
- Position the label close to connectors for easy identification during diagnostics or installation.
By incorporating this step into your electrical projects, you enhance the harness's longevity and the ease of future troubleshooting. Remember that the quality of your crimps, terminations, and grounds contribute to a reliable system. Adequately labeled harnesses simply augment this reliability and organization. Experiment with various labels and heat shrinks to find the best fit for your cables.
For any in-depth tasks under the vehicle, you will quickly appreciate the foresight of a well-labeled system — a simple glance can guide your next steps. This expertise in detailing ensures not just a functional but an easily serviceable electrical setup.
Call to Action for Viewers
Label Your Wiring Harness
Proper labeling of your wiring harness is crucial, especially when dealing with multiple features. Use a label maker, like the Brady BM 21 Plus, to create durable labels that simplify troubleshooting and maintenance.
Materials Needed
- Label maker (e.g., Brady BM 21 Plus)
- Ribbon cartridges in various colors (e.g., black on yellow, black on white)
- Heat shrink tubing (e.g., quarter-inch DR25 sheathing)
Instructions
- Select your label color and size. Black on yellow, 3/4 inch is a good standard choice.
- Print labels with the label maker, such as "Chase bar harness" for easy identification.
- Use a razor blade to carefully apply the label without leaving fingerprints.
- Place the label onto the sheathing near the connector and ensure it lays flat.
- Apply heat using a heat gun to shrink the tubing and secure the label in place.
Tips for a Professional Finish
- Precision: Make sure the labels lay flat during application.
- Durability: Select quality sheathing that withstands harsh conditions.
- Customization: Experiment with font sizes and label colors for optimal readability.
Keep Your Toolbox Updated
Regularly update your selection of labels and sheathing to find what works best for your specific needs. If engaging in a complex project, make sure to have a good assortment on hand.
Maintain Your Electrical System
Remember, a well-labeled harness not only aids in troubleshooting but also reflects the care taken in your electrical installation. Solid crimps, neat terminations, and reliable ground connections contribute to a dependable wiring system.
Engage with Our Community
Share your project details or any electrical-related questions in the comments. Consider subscribing to stay informed on all future shares and tips. Your participation and feedback drive the improvement and sharing of knowledge within our community.